Edit Projects in Rill Cloud
Cloud editing lets you change a deployed project directly in Rill Cloud, without cloning the repository or running Rill Developer locally. You edit files in a browser-based editor that works like Rill Developer, preview your dashboards, and publish your changes to production when they're ready.
Cloud editing is in beta. Behavior and UI may change before general availability.
How cloud editing works
Every edit session runs on its own Git branch, backed by a separate dev deployment of your project:
- When you start editing, Rill creates a branch from your project's primary branch (usually
main) and provisions a dev deployment for it. - Your edits are saved to that branch's deployment. Production dashboards are not affected until you publish or merge.
- When you publish, Rill merges the branch into the primary branch and your production deployment reconciles the changes.
The editor is available at https://ui.rilldata.com/<org>/<project>/-/edit. When you're working on a branch, the branch name appears in the URL (for example, /<org>/<project>/@my-branch/-/edit) and next to the project name in the header.
Edit sessions run in the dev environment, so any dev: overrides in your project files and environment variables scoped to dev apply. See Templating for how to separate development and production configuration.
Enable cloud editing
Cloud editing is controlled by the cloud_editing feature flag in your project's rill.yaml:
# rill.yaml
features:
  cloud_editing: true
New projects created with rill init or from an empty project in Rill Developer include this flag by default. For existing projects, add it to rill.yaml and deploy the change. See Feature Flags for other flags.
Required permissions
To edit a project, you need the project Admin or Editor role (the manage_dev permission). Organization admins can edit every project in the organization. The organization Editor role alone isn't enough; you also need the Admin or Editor role on the project itself. Viewers don't see the Edit button. See Roles and Permissions.
Start editing
- Open your project in Rill Cloud. The Edit button appears in the header on the project home page and on explore and canvas dashboards.
- Click Edit.
- In the Start editing dialog, do one of the following:
- To start a new branch, enter a Branch name and click Create & edit. Rill creates the branch from your primary branch.
- To resume earlier work, select Existing branch, choose a branch, and click Continue editing. The most recently updated branch is marked latest.
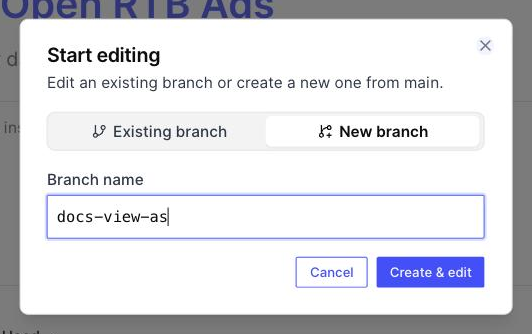
Rill provisions the editing environment, which can take a minute the first time. If you open Edit while viewing a branch that already has an editable deployment, Rill opens the editor for that branch directly.
Edit files
The cloud editor has the same layout as Rill Developer: a file explorer and data explorer on the left, and the file editor with a live preview on the right. You can add connectors, models, metrics views, dashboards and other resources with Add, or edit any YAML and SQL file in the project.
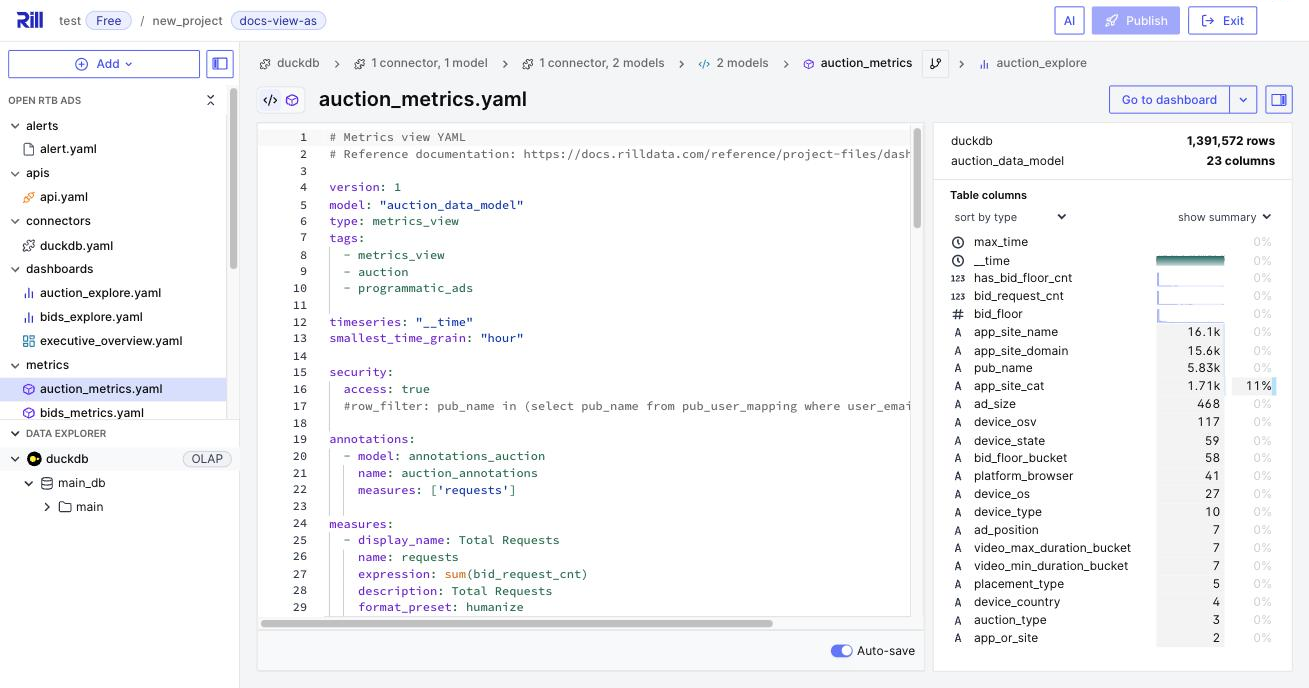
Files save automatically while Auto-save is on. Rill reconciles each change on the branch's deployment, so errors and previews update as you type, just like in Rill Developer. For details on the project files themselves, see Build.
Preview dashboards
To see a dashboard as your users will, open its file and click Preview (or Go to dashboard from a metrics view). The preview runs against the branch's deployment, so it reflects your unpublished changes. Click Edit in the preview header to jump back to the dashboard's file or, for explore dashboards, its metrics view.
Publish your changes
How you ship changes depends on how the project's repository is hosted.
Projects on Rill-managed Git
If Rill manages the project's Git repository (for example, a project deployed from Rill Developer or with rill project deploy without connecting GitHub), the header shows a Publish button.
- Click Publish.
- Review the list of changed files. Click a file to view its diff.
- Click Publish to confirm.
Rill commits your changes, merges the branch into the primary branch, and opens the production deployment in a new tab so you can watch it reconcile. If production is hibernated, publishing resumes it.
Projects connected to GitHub
If the project is connected to GitHub, the header shows Commit and Merge to production buttons:
- Click Commit, describe your changes, and click Commit & push. Rill pushes a commit to the branch in your GitHub repository.
- When you're ready to go live, click Merge to production and then Merge. Rill merges the branch into the primary branch and opens the production deployment in a new tab.
You can also open a pull request from the branch in GitHub instead of merging from Rill, if your team reviews changes there.
Remote changes and conflicts
If the primary branch has changed since you started editing, Rill asks you to pull the latest changes before you publish or merge. If your changes conflict with the latest version, Rill shows a Merge conflicts detected dialog where you choose Keep my version or Use the latest changes.
Test security policies with View as
When a dashboard has data access policies, you can preview it as a mock user from inside the editor, so you can check row filters, field restrictions and access rules on your branch before you publish them. View as in the cloud editor uses the mock_users defined in your project's rill.yaml, the same list Rill Developer uses.
-
In the cloud editor, open an explore or canvas dashboard and click Preview.
-
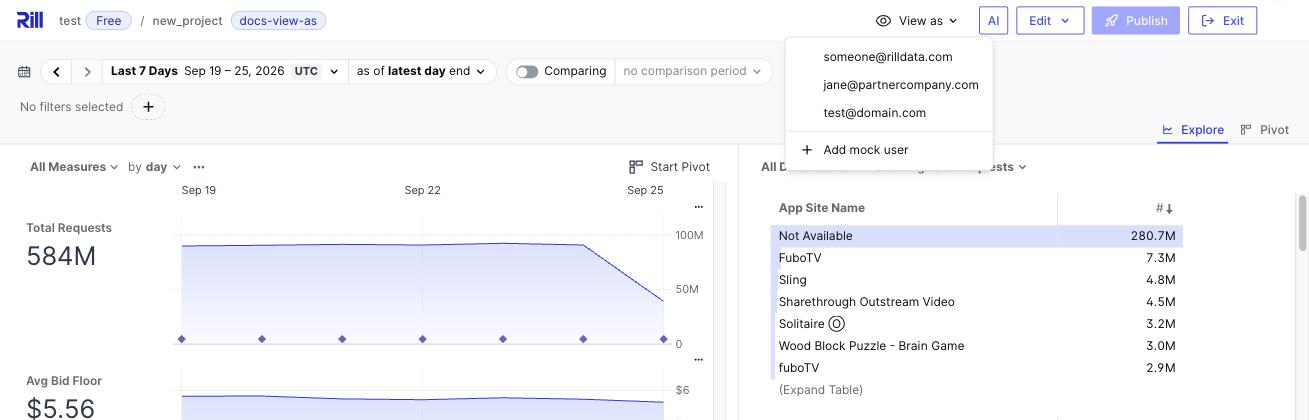
Click View as in the header and select a mock user. The dashboard reloads with that user's attributes, and the header shows Viewing as with the user's email.
-
To return to your own view, click the x on the Viewing as chip. Navigating to a different dashboard also clears the selection.
View as only appears on dashboards that have a security policy. It applies the attributes you define in mock_users and doesn't look up real users, so give your mock users the same email domains, groups and custom attributes as the people you're testing for. It doesn't change your own role or what you can edit.
For defining mock users, example policies to test and troubleshooting, see Test Access Policies with View As.
Manage branches and resources
Each edit session is a dev deployment that uses compute resources while it runs.
Inactive sessions hibernate
Dev deployments hibernate after a period of inactivity (one hour by default). Ten minutes before an idle session ends, the editor shows a warning banner. When a session hibernates, Rill tries to save uncommitted changes as a checkpoint commit on the branch, but commit or publish your work before you step away to be safe.
To resume a hibernated branch, click Edit and pick it under Existing branch. Project admins can change the inactivity timeout with rill project edit --dev-ttl-seconds.
View and manage branches
Project admins (the manage_project permission) can go to Status > Branches to see all branches with a deployment, including their author, status, slot count and last update. From the menu next to a branch you can:
- Open editor to continue editing it.
- Hibernate a running branch to free its resources, or Resume a hibernated one.
- Delete the branch and its deployment. For editable branches, this also deletes the remote branch, and any unpushed changes are lost.
Project editors can create branches but can't open the Status pages. To return to a branch, click Edit and pick it under Existing branch.
Development slots
Each dev deployment gets the number of Development slots configured for the project. Each slot provides 1 vCPU and 4 GiB of memory. Project admins can change the value under Status > Branches > Deployment slots, or with rill project edit --dev-slots. Changing slots may restart the affected deployments.
Cloud editing and Rill Developer
Cloud editing and Rill Developer work on the same Git repository, so you can use both:
- Use cloud editing for quick changes, reviews and testing policies without a local setup.
- Use Rill Developer for larger changes, working with local data, or when you need your usual Git tooling.
Changes published from the cloud editor land on your primary branch. Pull them locally before you continue working in Rill Developer, for example with git pull or rill project clone.