Create Advanced Models
Unlike SQL models, YAML models provide the ability to fine tune a model to perform additional capabilities such as partitions and incremental modeling. This is important as it adds the ability to refresh or load new data in increments thus resulting in decreased down time, and decreased cost of ingestion.
If you are unsure what are the required parameters, please review the reference page for Advanced Models.
Types of Advanced Models
The two topics of advanced models are Incremental models, Partitioned models and Staging Models.
What is an Incremental Model?
Unlike regular models that are created via SQL file, incremental models are defined in a YAML file and are useful to:
- decrease cost of ingestion,
- decrease loading time of new data,
- with partitions allow the ability to refresh specific portions of data,
- and more!
Whether your data exists in cloud storage or in a data warehouse, Rill will be able to increment and ingest depending on the settings you define in your model file.
Incremental Modeling is in ongoing development, while we do have support for the following, please reach out to us if you have any specific requirements.
Snowflake --> ClickHouse via Staging Model
S3 --> ClickHouse
Snowflake/Athena/Redshift/Bigquery --> DuckDB
S3/GCS/Azure --> DuckDB
Creating an Incremental Model
In order to enable incremental model, you will need to set the following: incremental: true.
type: model

sql: #some sql query from source_table
incremental: true
Incremental models with neither state nor partition defined will append data per incremental refresh from the source table. This will result in duplicate data and is not recommended.
Incremental Models with State defined
If your data is not partitioned, you can define the incremental model with a predefined state parameter.
type: model
incremental: true

state:
  sql: SELECT MAX(date) as date FROM TABLE

sql: |
     SELECT * FROM TABLE
        {{ if incremental }} WHERE COL_DATE = TO_DATE( '{{ .state.date }}', 'YYYY-MM-DD') + INTERVAL '1 day' {{ end }}
Once state is defined in an incremental model, its value can be used as a variable in your SQL statement. In the above example, the state returns the most recent date value from TABLE and adds an additional day. Then, the SQL statement will run based on the WHERE clause.
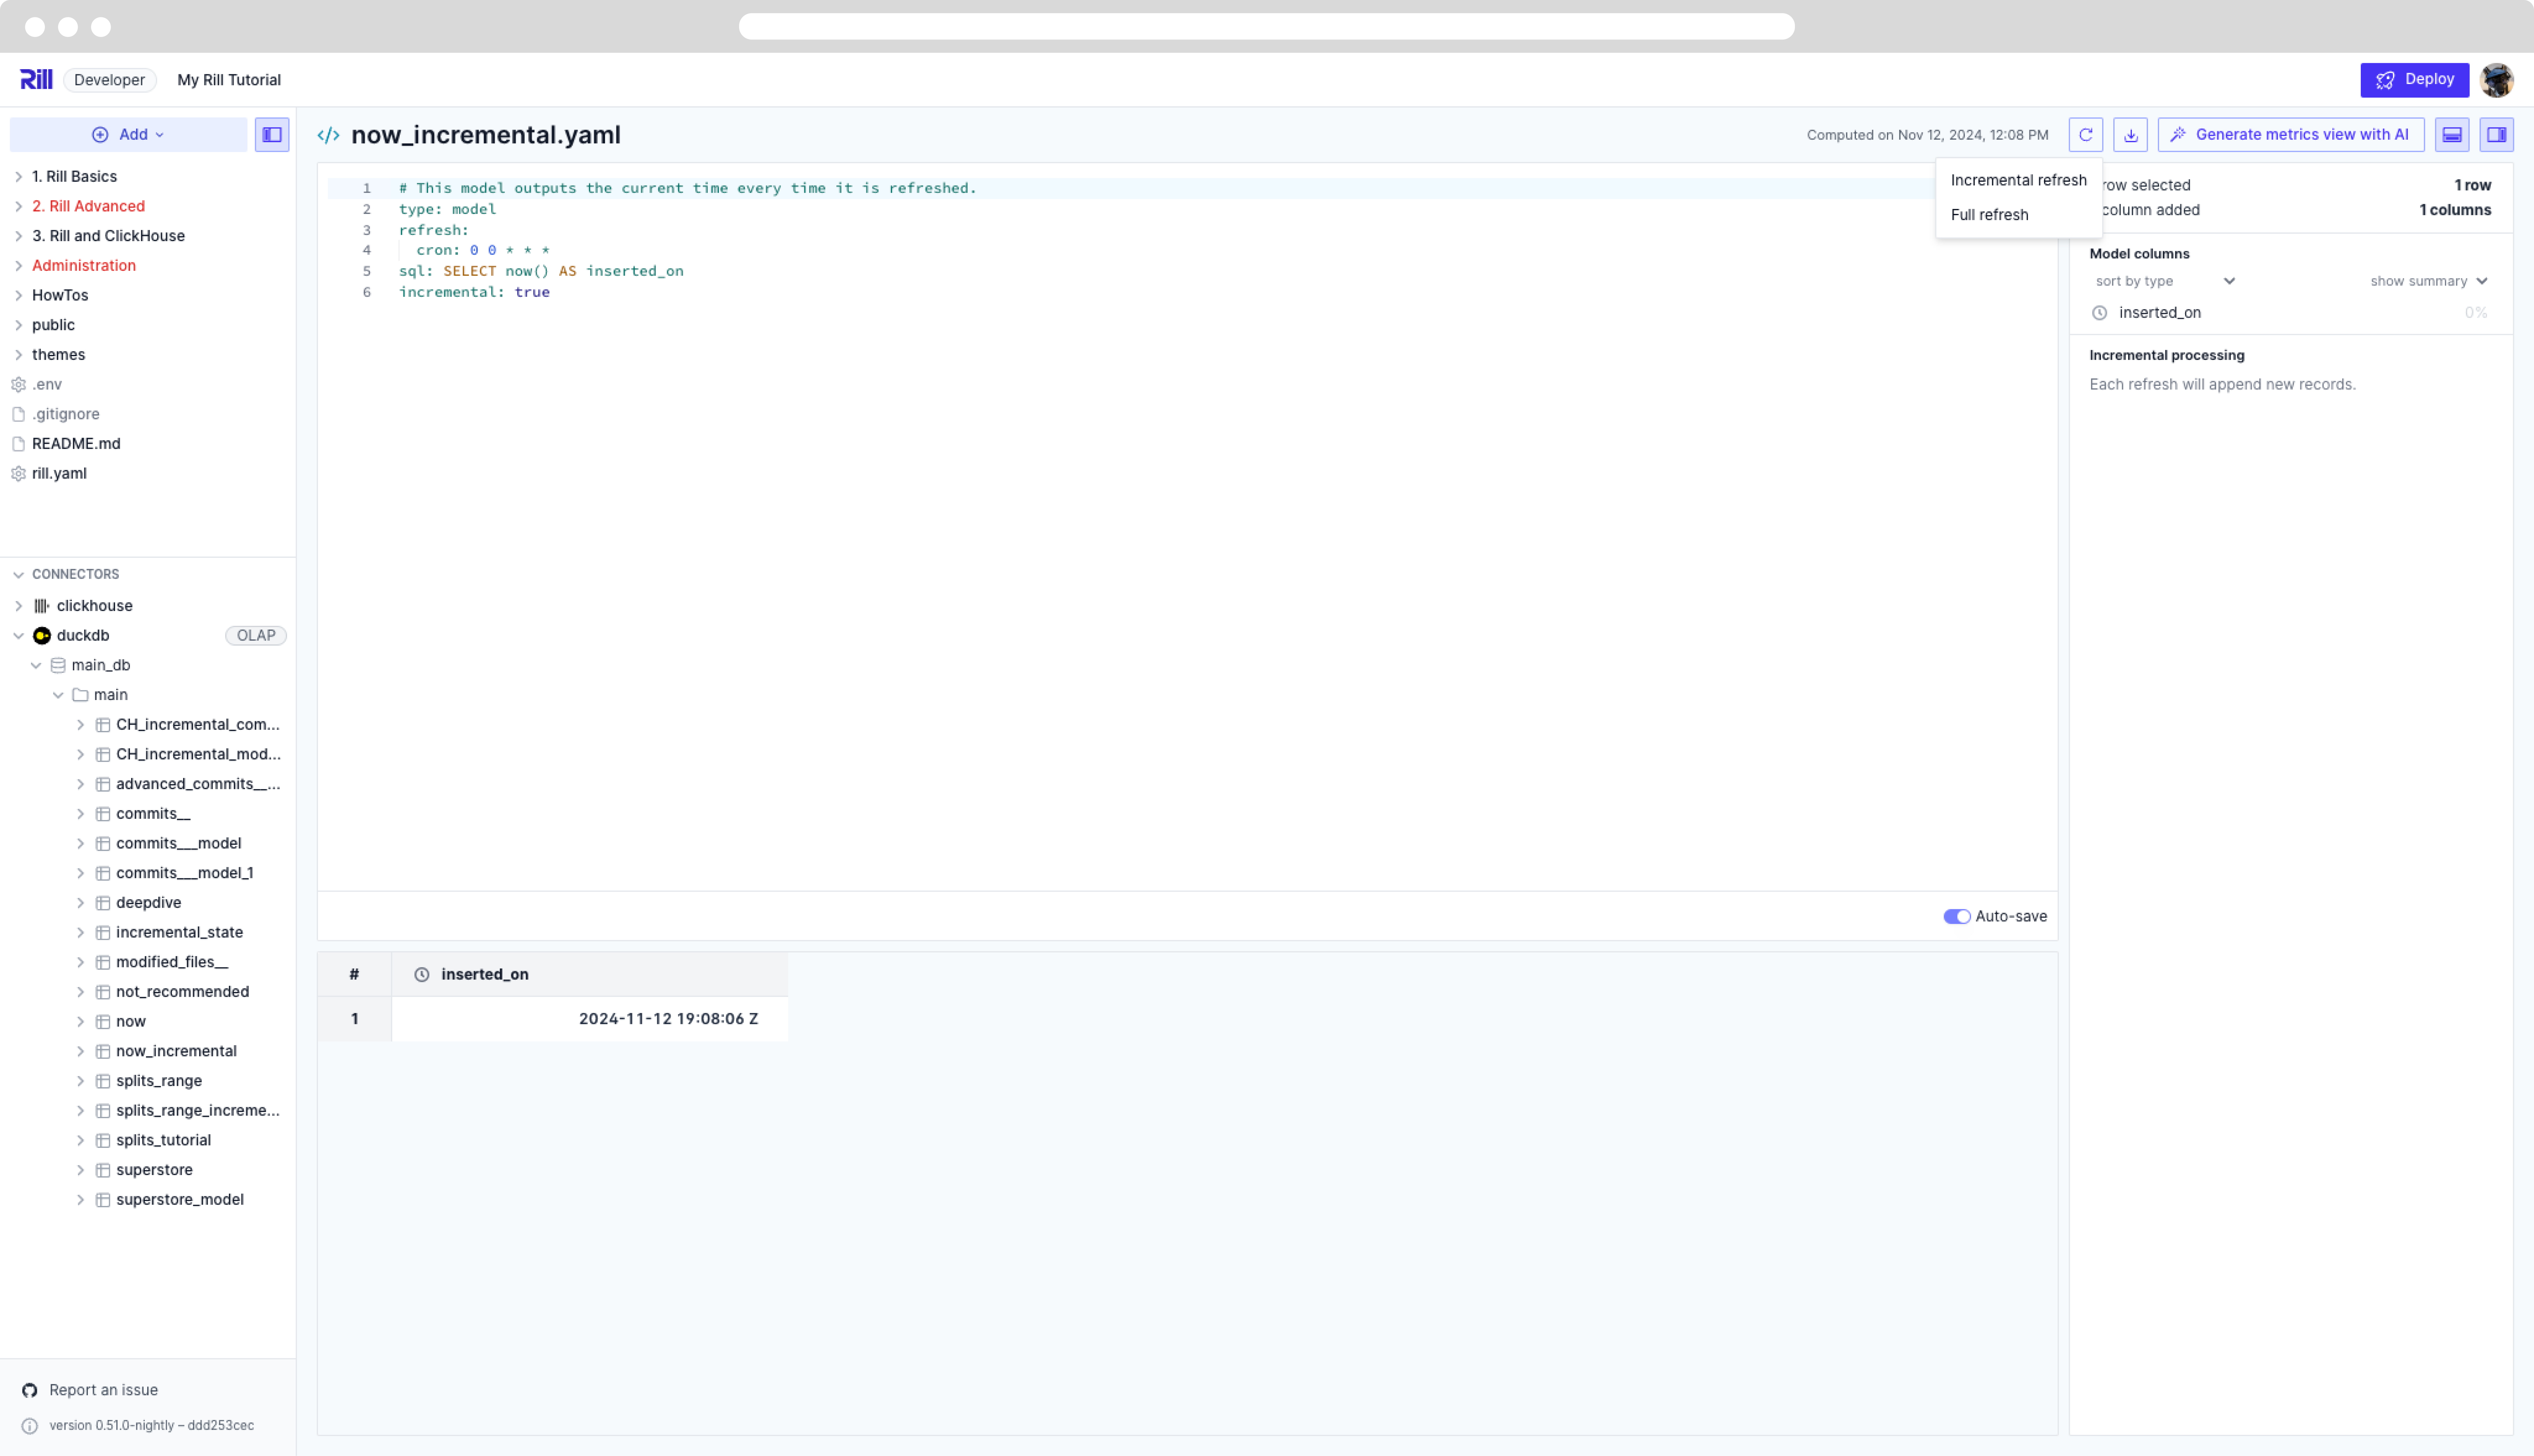
You can verify the current value of your state in the left hand panel under Incremental Processing.
In the above example, we are using patitions defined in DuckDB to define a range of days to use in the Snowflake query. The data will be written to a temp-data folder in S3 and written to ClickHouse after. Once completed, the data in temp-data will be cleared.
Refreshing an Incremental Model
When you are testing with incremental models in Rill Developer, you will notice a change in the refresh functionality. Instead of a full refresh, you are given the option for incremental refresh.

Once increments are enabled on a model, this grants you the ability to refresh the model in increments, instead of loading the full data each time. This is handy when you're data is massive and reingesting the data may take time. For a project on production, this allows for less downtime when needing to update your dashboards when the source data is updated.
There are times where a full refresh may be required. In these cases, running the full refresh is equiavalent to running a normal refresh with incremental disabled.
When selecting to refresh incrementally what is being run in the CLI is:
rill project refresh --local --model <model_name>
Kind in mind that if you select Full refresh this will start the ingestion of all of your data from scratch. Only use this when absolutely required. When running a full refresh, the CLI command is:
rill project refresh --local --model <model_name> --full
What are Partitions?
In Rill, partitions are a special type of state in which you can explicitly partition the model into parts. Depending on if your data is in cloud storage or a data warehouse, you can use the glob or sql parameters.
You can manage partitions via the CLI using the rill project partitions command.
rill project partitions
List partitions for a model

Usage:
  rill project partitions [<project>] <model> [flags]

Flags:
      --project string      Project Name
      --path string         Project directory (default ".")
      --model string        Model Name
      --pending             Only fetch pending partitions
      --errored             Only fetch errored partitions
      --local               Target locally running Rill
      --page-size uint32    Number of partitions to return
Defining a Partition in a Model
Under the partitions: parameter, you will define the pattern in which your data is stored.
SQL
When defining your SQL, it is important to understand the data that you are querying and creating a partition that makes sense. For example, possibly selecting a distinct customer_name per partition, or possibly partition the SQL by a chronological partition, such as month.
partitions:
  sql: SELECT range AS num FROM range(0,10) #num is the partition variable and can be referenced as {{partition.num}}
  #sql: SELECT DISTINCT customer_name as cust_name from table #results in {{partition.cust_name}}
Depending on the column name of the partition, you can reference the partition using {{ .partition.<column_name> }} in the model's SQL query.
partitions:
  sql: SELECT range AS num FROM range(0,10)
sql: SELECT {{ .partition.num }} AS num, now() AS inserted_on
glob
When defining the glob pattern, you will need to consider whether you'd partition the data by folder or file. In the first example, we are paritioning by each file with the suffix data.csv.
partitions:
  glob: gs://rendo-test/**/*data.csv
If you'd prefer to partition it by folder your can add the partition parameter and define it as directory.
glob:
  path: gs://rendo-test/**/*data.csv
  partition: directory #hive
The glob partition has a predefined {{ .partition.uri }} reference to use in the model's SQL query.
partitions:
  glob:
    connector: gcs
    path: gs://path/to/file/**/*.parquet
sql: SELECT * FROM read_parquet('{{ .partition.uri }}')
Viewing Partitions in Rill Developer
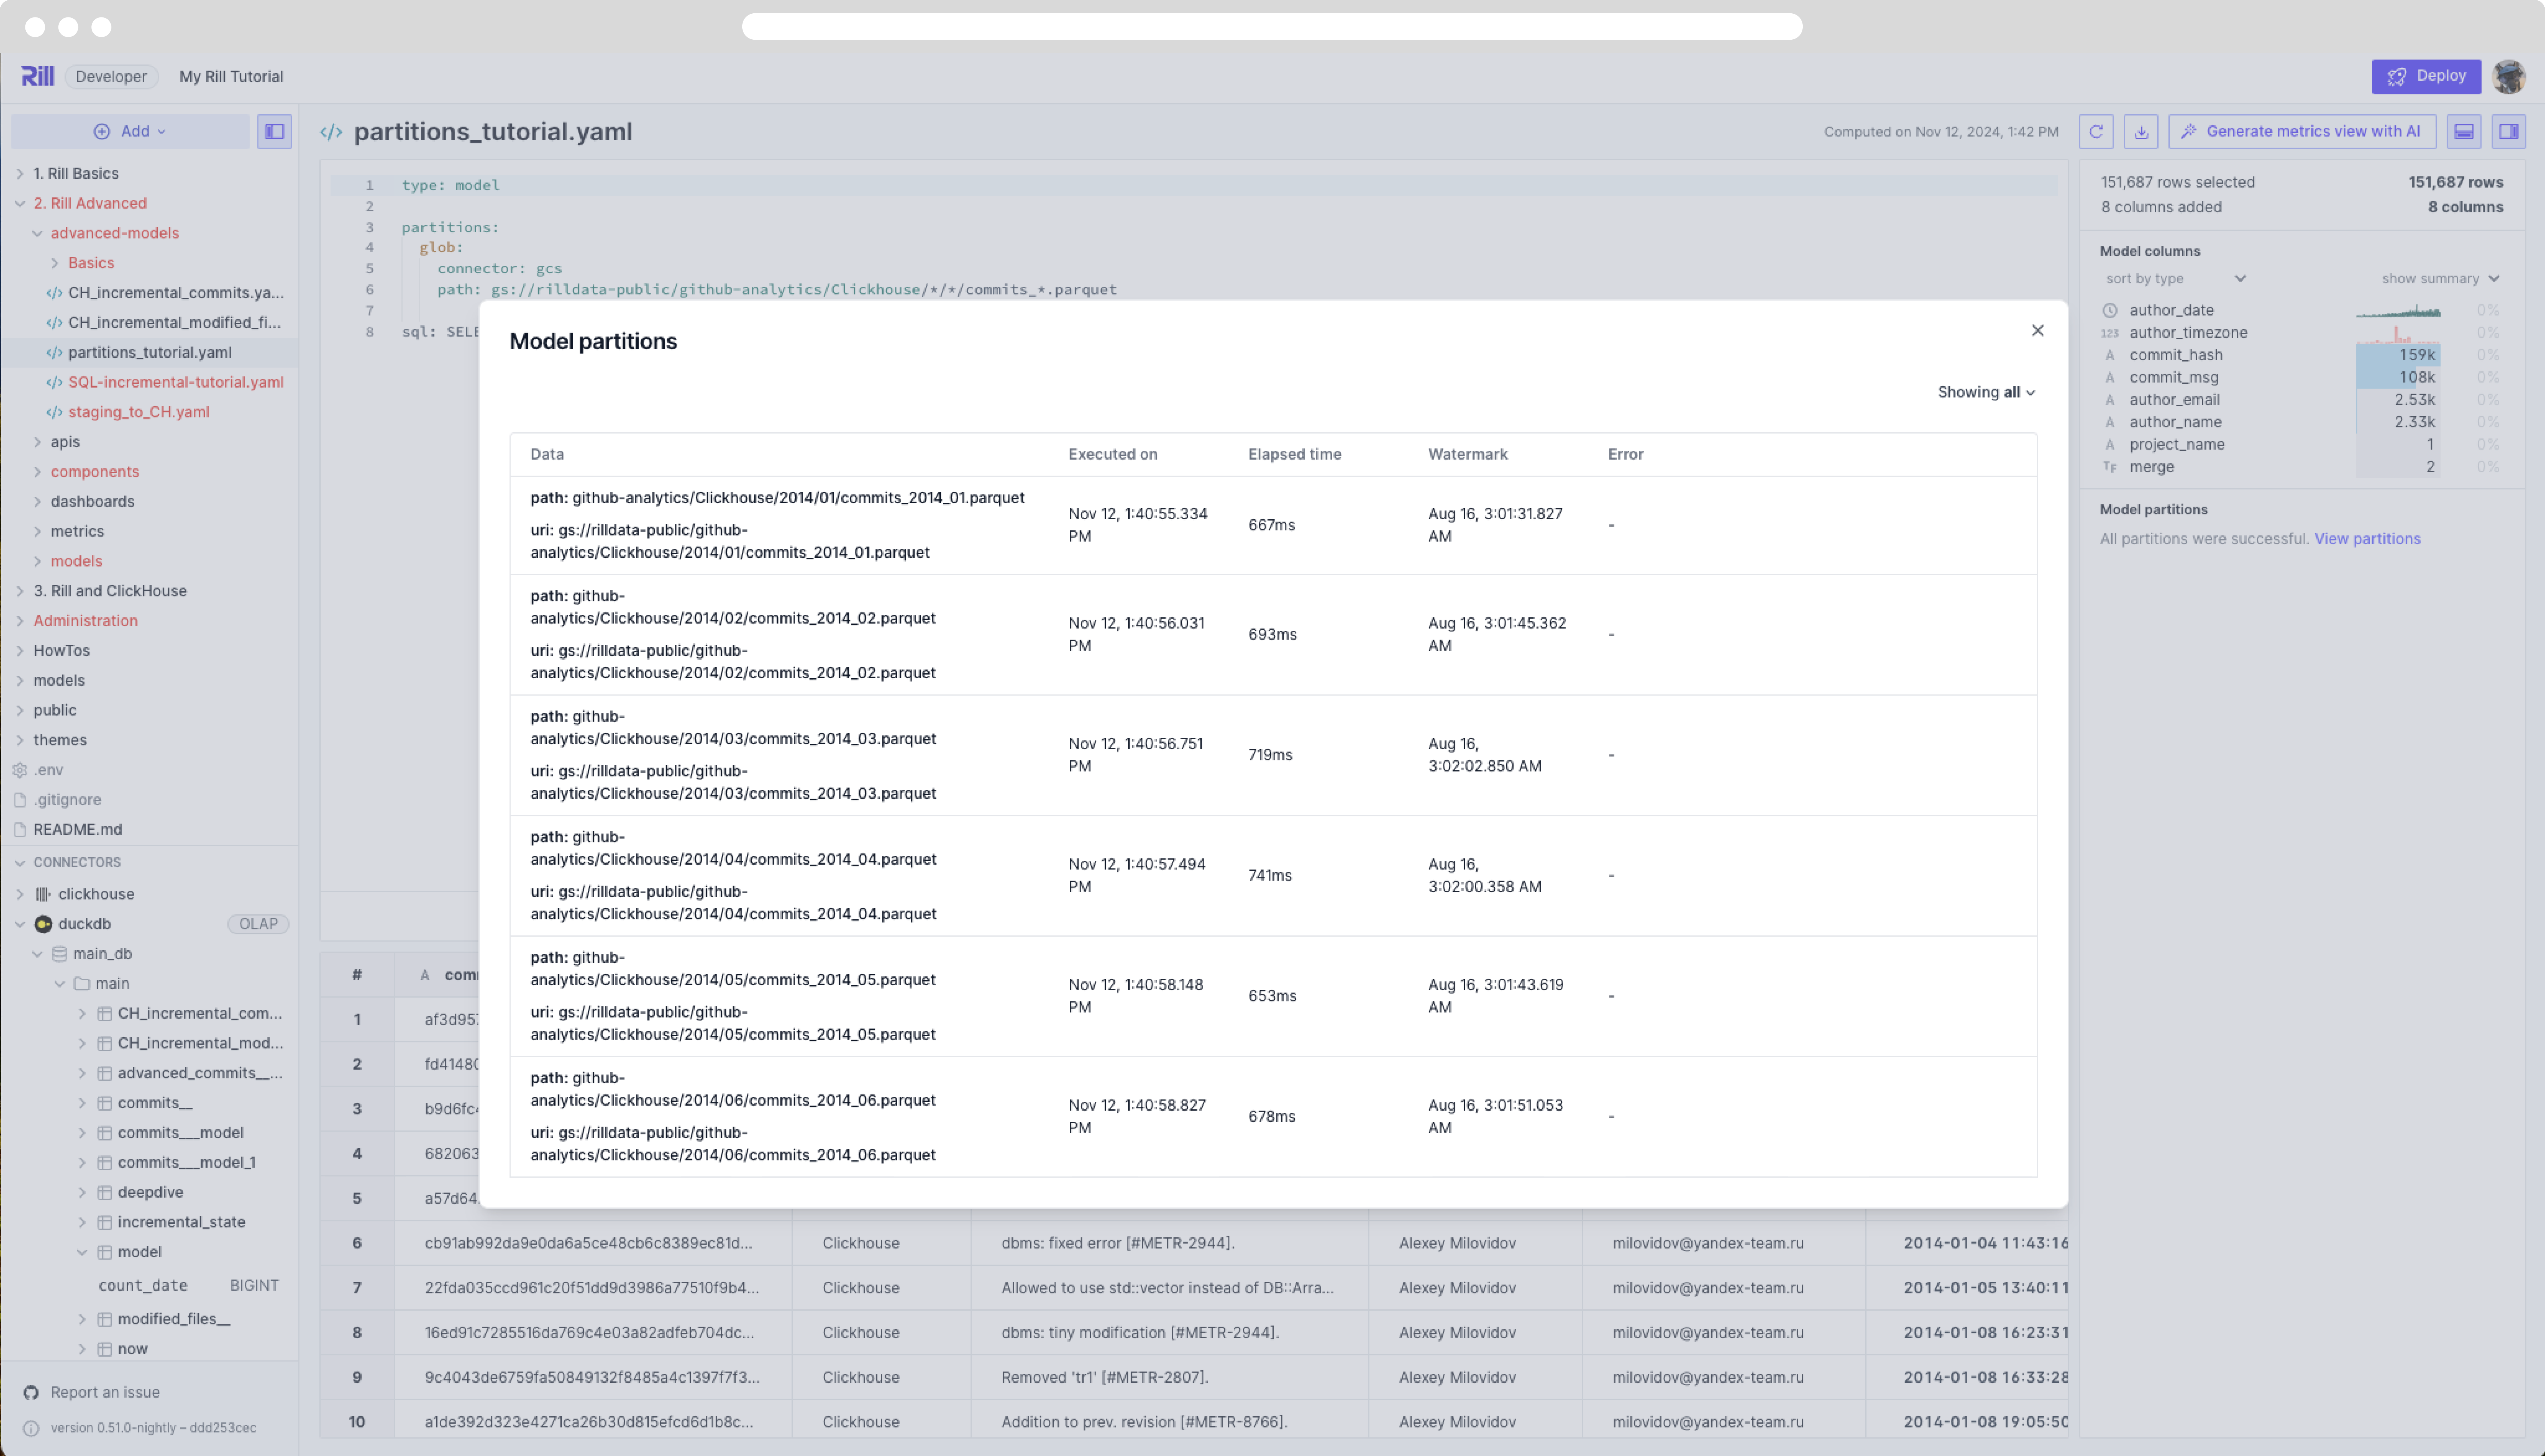
Once partitions: is defined in your model, a new button will appear in the right hand panel, View Partitions. When selecting this, a new UI will appear with all of your partitions and more information on each. Note that these can be sorted on all, pending, and errors.

You can sort the view on all partitions, pending partitions and error partitions. For any of these paritions, you can select 'Refresh Partition' to refresh. (This is only available for incremental partitioned models.)
- all partitions will show all the available paritions in the model.
- pending partitions will show the partitions that are waiting to be processed.
- error partitions will display any partitions that errored during ingestion.
Viewing Partitions in the CLI
Likewise to the UI, you can view the partitions of a model within the CLI.
rill project partitions
List partitions for a model

Usage:
  rill project partitions [<project>] <model> [flags]

Flags:
      --project string      Project Name
      --path string         Project directory (default ".")
      --model string        Model Name
      --pending             Only fetch pending partitions
      --errored             Only fetch errored partitions
      --local               Target locally running Rill
      --page-size uint32    Number of partitions to return per page (default 50)
      --page-token string   Pagination token
If running locally, you will need to add the --local flag to the command.
rill project partitions model_name [--local]
  KEY (10)                           DATA        EXECUTED ON            ELAPSED   ERROR
 ---------------------------------- ----------- ---------------------- --------- -------
  ff7416f774dfb086006d0b4696c214e1   {"num":0}   2024-11-12T22:48:49Z   95ms
  ...
If you try to refresh a partition using the following command on a partitioned but not incremental model, you will experience the following error:
rill project refresh  --model <model_name> [--local] --partition ff7416f774dfb086006d0b4696c214e1
Error: can't refresh partitions on model "model_name" because it is not incremental